Incredible things can be made from paper beautiful crafts. They are very easy to manufacture, due to which even very small creators are happy to make them. Best for developing Creative skills origami for kids. In addition, it is this kind of needlework that contributes to the manifestation of such qualities as accuracy, adherence to a step-by-step plan, concentration and perseverance.
Incredibly beautiful crafts can be made from paper
Classes with children should start with the easiest schemes.. A simple explanation of the actions will help the kids to cope with the work quickly and with pleasure.
Origami dog
A three-year-old kid will cope with this work. After all, the whole work consists in several successive stages. In conclusion, it will only be necessary to draw eyes and a nose.

A 3 year old can do the job too.
Progress:
- Cut a square out of paper and then fold it diagonally.
- Mark the middle on the triangle, which is the result.
- Bend the ends down on one side and the other.
- Bend the bottom corner upwards.
With a marker, draw the eyes and nose of the resulting dog.
Gallery: origami for children (25 photos)


How to make an origami cat step by step
This simple work will also be a fascinating pastime for young creators. In a very short period of time, they will be able to make a cute cat out of paper.

This simple work will also be a fascinating pastime for young creators.
Progress:
- leaflet square shape fold diagonally.
- Fold the triangle that has formed in half and thus outline the axis.
- Reverse the triangle.
- Mark the center of the sides and bend the ends.
- Bend the upper tip and tuck it behind the resulting ears.
Draw the cat's antennae, nose and eyes. In this way, you can also make a birdhouse, a tree or a house where animals live.
Origami: jumping frog (video)
Origami figures for children from 6 to 8 years old
Children of the younger school age are already able to make more perfect figures than babies. For example, you can make a whale and arrange the figurine in the form of a whole picture.
What is necessary:
- blue and white paper;
- glue;
- scissors;
- pencils;
- markers.

You can make a whale and decorate the figure in the form of a whole picture
Progress:
- Cut out a square of the appropriate size from blue paper.
- Bend the figure diagonally and immediately return to its original position.
- Bend the corners to the fold line on both sides.
- Bend the remaining straight corner towards the opposite corner.
- After that, the workpiece must be bent along the very first fold line.
- Fold the top corners inward a little.
- Also bend the tail inward.
- Make a small incision along the fold line of the tail, and then bend one of the cut halves to the side.
- In the same way, make a second whale, but smaller.
- Glue both figures on a white sheet.
Finally, paint the background.
Origami crafts for boys and girls 9-10 years old
Making an origami dragon is not easy. But nevertheless, the activity is fascinating. The resulting figurine will become great decoration children's room.

Making an origami dragon is not easy.
Progress:
- The paper square must be folded diagonally.
- After that, bend the upper sides to the diagonal, but do not draw fold lines in the lower part.
- Fold the bottom sides in the same way.
- Now bend the square in half, aligning the lower and upper corners and going from the corners to the intersection of the lines.
- Simultaneously bend the workpiece along all lines.
- Bend the left of the two halves back, and turn the workpiece.
- Turn the central triangles on both sides to the left.
- Bend all paper layers, thereby dividing each corner into two equal parts.
- Bend the right side along the line inward.
- IN right side throw a couple of triangles.
- Repeat the same steps now with the left side of the workpiece.
- Triangles then return to their original position.
- On both sides, make double folds, pushing the triangles to the central part.
- Throw a couple of triangles to the left side.
- Bend the bottom corners inward both in front and behind.
- Lift the top up.
- Bend the future tail inward.
- Then press on the upper right edge of the figure and bend the right side along the lines.
- Bend the lower parts of the tail inward.
- Bend the obtuse right corners inward.
- Turn the right corners back and bend the head inward.
- Pull it out now.
- Pull the paper layers that are inside the head out.
- Slightly bend the tip of the muzzle.
- Bend the tail and form the paws.
Origami for children 11 and 12 years old: bat
A bat figurine from a square sheet of paper can be made in just a few minutes. To do this, just follow the instructions exactly.
Progress:
- Fold the sheet in half, mark the fold line and straighten it immediately.
- Bend the figurine in such a way that you get a kind of boat.
- bend over upper part triangle and thus form the head.
- Bend the figure into reverse side in half.
- Bend both wings to the right side.
- Bend parts of the wings on both sides along the fold line.
- Now you need to bend the triangles on both sides.
- Expand the resulting figure.
How to make a gnome
Funny gnome will become original decoration Christmas tree and perfectly emphasize the festive atmosphere. You can make such a craft with the children, as the fabulous gnome is going to be very simple and fast. For many origami exist ready-made schemes, they can be downloaded from the Internet.
Progress:
- Mark a red square sheet diagonally and turn the white wrong side towards you.
- Fold the sheet so that a pair of adjacent sides are in contact.
- Turn the sharp corner up.
- Turn the workpiece to the front side.
- Unscrew the top of the corners by two thirds of its length downwards.
- Now unscrew it a couple more millimeters.
- Bend the corners wrong side thus forming a triangle.

Funny gnome will become an original decoration of the Christmas tree
Draw the eyes of the resulting gnome.
Seal in origami technique
To create a seal figurine, as well as for other origami products, you will need a square piece of paper. The manufacturing technique is simple. Only a few steps of work must be completed in order for the delightful seal to show off on your desktop.
Progress:
- Fold the paper diagonally and immediately fold the triangle.
- Open and straighten the pocket on the right.
- Bend a couple of sides along the bisectors of the lower corners.
- Drag the bottom of the corners of the figure up, bending along the lines.
- Bend the right half of the workpiece back.
- Bend the upper part of the triangle that has formed outward.
- Bend the lower right corner along the line.
- Repeat the same steps on the back of the workpiece.
- Turn out a couple of petals from the beak, which formed at the top of the beak.
- Bend the tip of the muzzle inward.
- Do the same on the reverse side.
- Bend out the tip of the tail and slightly bend the back.
Paper cat family (video)
What can be in common between a postcard for mom, a fun theater and a funny aquarium? Do not know? Then you should definitely refer to the "Origami" section on our website for teachers and educators. There are lots of creative ideas here. step by step master classes and detailed photo reports on the methodical process of making paper figures.
On the pages of the section you can find many examples of the simplest paper construction, accessible even to the smallest. As well as instructions for the phased creation of real masterpieces of origami technique - amazing crafts that you can rightly be proud of!
Origami - the art of paper folding for kids!
Contained in sections:Includes sections:
- Origami, paper construction. Summaries of classes, GCD
Showing publications 1-10 of 2452 .
All sections | paper origami
Master Class "Heart". Origami Origami literally means« paper crafts» . folding paper is a creative process. The guys get acquainted with the methods of modifying flat forms by bending, folding, resulting in ...
 MASTER CLASS "Bookmark for books in technology" origami"»
for older preschool children. Target: Making bookmarks in the technique " origami with application elements. Tasks: Teach children to make bookmarks for books with their own hands. Exercise children in the ability to smoothly and accurately ...
MASTER CLASS "Bookmark for books in technology" origami"»
for older preschool children. Target: Making bookmarks in the technique " origami with application elements. Tasks: Teach children to make bookmarks for books with their own hands. Exercise children in the ability to smoothly and accurately ...
Paper Origami - Modular Origami: Blue Rose. Master class with step by step photo
Publication “Modular origami: Blue rose. Master class with step by step ... "  modular origami: Blue Rose. Master class with step by step photo Author: Seyitmedova Oksana Seytievna, educator, Gymnasium No. 1503 Description of the material: This material It will be useful for educators, teachers of additional education, parents. Purpose: Making a flower from...
 MAAM Pictures Library
Circle work "Origami" Municipal budgetary preschool educational institution « Kindergarten"Mishutka" Circle work on the topic: "Magic origami" Educator: Sivak Yulia Yuryevna p.Khandyga, 2020 Explanatory note preschool age- a bright, unique page in the life of every person ....
 This master class is conducted by my pupil, Polina, a 4th grade student. She is fond of origami technique and often helps me in class with the first class. So, prepare 4 squares different color 15 cm in size. Bend the square diagonally. Bend the side corners towards the center...
 Purpose: Teaching children how to make flowers using the origami technique. Tasks: 1. Arouse interest in children to make flowers from colored paper using the origami technique. 2. Improve tactile perception, dexterity, accuracy, patience. 3.Use funds for development fine motor skills...
Origami from paper - Tulip origami master class as part of circle activities in the preparatory group
 Goal: creating a tulip using the origami technique Tasks: continue to consolidate paper folding techniques in the origami technique using the basic elements of the technique; develop observation, eye, fine motor skills of hands; keep educating...
 "The Magical World of Origami". "Gnome" (03/05/2020. Purpose: Continue to teach children to make paper figures from two parts, teach clearly, follow the instructions of the teacher. Equipment: Squares (8 * 8, 6 * 6) of different colors, paper trimmings, glue, scissors. Move works: 1. The gnome is made of two...
 Hello, dear friends and guests of my page! I bring to your attention a master class on making paper crafts using the "origami" technique. Flowers are easy to make and look interesting. Necessary materials and tools: bilateral colored paper for printer...
Advice for parents "The value of origami for the development of children" Advice for parents "The value of origami for the development of children." As children we all ran paper airplanes and made uncomplicated hats from newspapers - they just didn’t know that this occupation is called “origami” and has a respectable age. The art of paper folding arose...
Origami for kids
Looks especially attractive modular technology. This is a technique for adding paper figures, when the result is voluminous or three-dimensional. At the same time, the components of the figurine are modules that are folded according to the rules and laws of classical origami. These modules are inserted into each other, sit very tightly and do not allow crafts to fall apart. The site presents options for modular fish, Christmas trees and penguins, educators present entire paper compositions to the judgment of colleagues and site visitors.
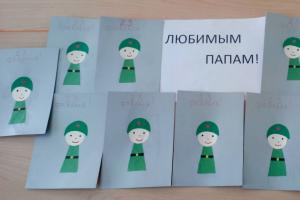
And now let's get back to the fact that our whole life is a theater. However, the actors in it will not be people, but all the same paper figures. A very interesting and budget version of creating a whole theater from colored paper. The dolls are funny and original. A whole group can be involved in the production of such actors and scenery, and the scenario of the holiday can be viewed on the same site.
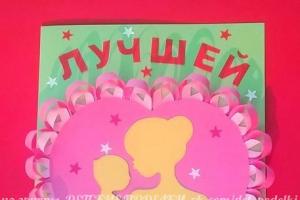
And the most touching section, of course, is still the variation on the theme of postcards for mom. Teachers offer this technique supplement lace doilies, then the gift is especially charming and tender. Every mother will love this spring arrangement of tulips.
This site contains mainly diagrams and videos of origami folding.
Sections of origami folding schemes
Schemes of folding origami animals and not only | Schemes of folding origami plants. This section also includes flowers that can be found in a separate category. |
Schemes of folding origami of various objects | Schemes of folding origami flowers, part of the section "Origami plants" selected in a separate category |
Movable origami folding schemes. Everything that moves, jumps, jumps | Origami schemes consisting of folding several sheets of paper |
Origami folding patterns to inflate | Schemes of folding origami napkins for table setting |
A selection of origami from all sections containing videos of folding schemes |
This site contains diagrams and videos of origami folding.
On this moment the resource is mainly designed for beginners, almost all assembly schemes are quite simple, but interesting even for those who have long been fond of origami.
1. Nothing to do with the child? Teach him how to fold simple origami from paper. This will not only interest him, but also develop fine motor skills of the fingers, teach patience and attentiveness, and introduce him to the world around him. Children are very fond of doing something with their own hands, and not only children, it is always nice to create something so that later you can proudly say: “I did it myself.”
2. Best gift- made by hand. Unusual craft paper is a great option, because the gift turns out to be absolutely unique, and most importantly, this is not just a hastily bought item in the nearest store, but original thing, which was made on purpose, for which a person spent time figuring out the origami scheme, sometimes even more than one hour. Someone will tell you what to give paper craft not serious, but just look at this rose, like a real one! And from these you can collect a whole bunch. Of course, you can also give money, but even here you can present a gift creatively by folding a paper hare or a bull out of money.
3. Valentines. Yes, yes, here you can also show individuality and surprise your soul mate not with an ordinary paper-cut heart, but with a beautiful neat paper valentine folded using the origami technique.
4. Useful little things in the form of paper envelopes, beautiful gift boxes or photo frames. All this is, first of all, original, unusual and quite easy to do on your own. step by step origami schemes.
5. Origami is a way to decorate a room. A paper swan made of modules can take its rightful place in any home and attract the admiring glances of guests. Do not forget about kusudamas - bright flower balls. Such paper crafts can be hung on a string in any corner of the apartment.
Origami for kids is a quick and budget-friendly way to keep a child entertained in their free time or while traveling. Children are delighted with paper cranes, flowers and jumping frogs and want to learn how to make the same shapes.
But paper figurines can become not only funny toys for children. Origami is given as a gift-talisman or decorates the house with them. In addition, the art of paper folding is a useful activity for children of any age.
What are the benefits of origami for children
The first to use origami in children's art was the German teacher of the 19th century, Friedrich Fröbel. He created a paper origami course for kids to help them better understand geometry.
But this is not the only practical benefit of origami for child development. Educators and psychologists have noticed that folding paper figures helps children:
- develop fine motor skills and accuracy of movement;
- learn to concentrate;
- train memory and logical thinking;
- develop a sequence of actions.
When can you start doing origami with a child
It all depends on the desire and capabilities of the child. At 3-4 years old, you should try to evenly fold a square of paper in half, from 5-6 years old - make simple figures with the help of an adult. If the child shows interest, gradually classes can be complicated. In any case, origami classes have a positive effect on the development of fine motor skills in children, which means crafts will get better and better.
Origami for kids: 12 useful videos
To practice origami with a child, you will need: paper (white and color), scissors, pencil, ruler, glue. The most important thing for the first lessons is to choose the available schemes. To simplify your task, we have made a useful selection of videos of paper origami master classes for children.
cat
Rybka
Dog
ship
Butterfly
Bunny - bookmark for books
heart
Turtle
Pigeon
jumping frog
Crane
Tulip
History of origami
When folding figures with a child, tell him that he is engaged in a very ancient type of arts and crafts. It is not known exactly where origami originated. History says this: when the secret of making paper, which the Chinese zealously kept, came to Japan, a real origami boom began here. It was such a valuable material that it was used for religious ceremonies. Tearing a sheet of paper was considered a sinful act.
The first paper figures began to be made in monasteries, where paper folding turned into a real art. But as soon as paper ceased to be a rarity and became more affordable, other classes also picked up the idea of origami. In medieval Japan, rich parents did not skimp on any money, just to find a good origami master for their child.
Origami was used everywhere: lovers hid messages in them, aristocrats decorated coats of arms with them, not a single celebratory event did not do without paper figures. But the secrets of folding were strictly kept within the family until the 19th century. With the development of industry, the value of paper fell and origami ceased to be an occupation accessible only to the aristocracy.
A new surge of interest in origami occurred in the 60s of the XX century. Origami master Akira Yoshizawa came up with a system of universal signs, which greatly simplified the understanding of the technique of folding paper figures. Since that moment, origami has become a worldwide hobby for adults and children.
Was this information helpful?
Not really
 Basic origami forms are the basis on which a variety of models are created. Some with minimal addition of folds, and some are so far away from the “base” that it’s even impossible to steal them! In addition, many of the simplest basic origami shapes serve as the basis for folding more complex basic shapes. Here are six of the simplest basic shapes available for preschool children to fold:
The basic shape of origami "Triangle" Triangle
The basic form of origami "Kite"
The basic form of origami "Pancake"
The basic form of origami "Book"
The basic form of origami "Door"
The basic form of origami "House"
The basic form of origami "Triangle" for children from 4 years old.
The simplest form. We bend a square sheet of paper diagonally. Kids perceive this explanation well: we make a “kerchief” out of a “handkerchief”. For neat folding, we connect the opposite corners, hold them with the finger of one hand, and smooth the crease with the other hand.

 Based on the basic "Triangle" shape, you can do with babies, for example, or a model and
The basic form of origami "Kite" for children from 4 years old
First, fold the basic triangle shape, expand it. We have the intended diagonal.
We connect the sides of the triangle with this line and the basic kite shape is ready. 
 Based on this basic form, you can make a modular model
The basic form of origami "Pancake" for children from 5 years old
Fold the square diagonally first in one direction. Unfold and fold into another. Let's expand the square again. We get two diagonals outlined by folds.
The intersection of the diagonals is the center of our square. Bend all the corners of the square to the center.

 This is the basic form of "Pancake".
The basic form of origami "Book" for children from 4 years old
A very simple shape - just bend the square in half.


The basic form of origami "Door" for children from 5 years old
Fold the square in half and unfold.
We bend the edges of the sheet to the intended center line. This is the basic form "Door"


The basic form of origami "House" for children from 6 years
This is the most complex of the basic forms presented here.  Fold the square in half, joining the top and bottom sides of the square.
Fold the resulting rectangle in half and unfold. We get the central line outlined by the fold.
We bend both sides of the rectangle to this line.  Now the most difficult part of the model remains. On one side we take the fingers of the right hand the most upper layer paper and begin to unfold it from the center.
 Hold the model with your left hand so that the remaining layers of paper remain in place. When we completely bend the paper, a triangle roof will form on top. Smooth it out with your finger. We repeat the same on the other side. It turned out a house with two "entrances".
  You can use the basic origami "House" shape to create.
More complex basic origami shapes: square, double triangle, fish, bird and catamaran can be found in the article.
To read diagrams correctly and easily, get acquainted with. But keep in mind that these symbols are intended primarily for you. Children are ready to get acquainted with the elements of these signs only after the age of seven, and they will be able to fully “read” the schemes not earlier than 10-12 years old, when abstract-logical thinking is formed in them.