Every woman uses cosmetics, but many are not familiar with the correct sequence of applying makeup to the face, and this is precisely the key to a harmonious appearance and healthy skin.
The entire art of makeup is built on basic principles. You need to be responsible when choosing cosmetics: buy them in trusted stores, remember that good products cannot be cheap. High-quality products will not cause problems with application. Low-priced cosmetics often contain low-grade ingredients that can cause skin problems.
The individual characteristics of the face cannot be neglected. Not only the shade of foundation, but also the color of eye shadow, lipstick and blush depends on your skin tone.
Select a makeup base that is suitable for your skin type (oily, dry, normal or combination) so as not to provoke peeling or acne. For women with sensitive skin or those prone to allergies You should study the packaging of makeup products especially carefully.
Sequence of applying cosmetics
The sequence of applying makeup to the face is followed, so that layers of cosmetics do not overshadow each other and do not smear for as long as possible.

What is facial contouring?
Contouring (contouring, sculpting) is a technique for giving the face the desired shape and emphasizing the desired features using cosmetics.
 Contouring your face will help you follow the correct sequence of applying makeup to your face.
 This makeup method is based on the role of chiaroscuro - by darkening or lightening a certain area of the skin, visual correction can be achieved.
Contouring the T-zone and cheekbones
An important stage that will highlight the beauty of a woman if you follow the sequence of applying makeup and pay attention to the shape of your face.
It can be round, square, triangular, oval and heart-shaped - it’s easy to determine if you look in the mirror. 
Contouring has general rules:


Chin and neck correction using contouring
Chin makeup will be the last step in creating the ideal face shape. If it seems too massive, it is darkened on the sides, and highlighter is applied in the center and up to the upper lip. For other types, the chin is usually completely light and only slightly emphasized with a darker tone. 
Many people often forget about the neck, which is why it stands out from the general background, which leads to the idea that the girl has a lot of makeup on her face. You need to take care of a smooth transition from the cheekbones to the neck. Foundation and powder are used to disguise small irregularities and wrinkles.
If the neck looks short or saggy, then the solution would be to apply dark tones to the area under the chin. The pronounced depression between the collarbones also looks elegant, so makeup artists darken it.
Even out skin tone
Before applying basic makeup to your face, you should make sure that your skin has an even, natural tone. Failure to comply with this step will disrupt the entire sequence of actions. To even out the tone, foundations, bronzers or powders are used - the choice of product depends on individual preferences.

Level the tone in stages:

Eyebrow shaping
If your eyebrows are in order and there are no extra hairs around them, then it’s time to start applying cosmetics to them. The most popular products: pencil, lipstick and eyebrow shadow.
Pencil and lipstick are easy to use and easy to remove. Minus - the lines may look too sharp and unnatural , so it’s better to choose shades that are not too dark.

Shadows are a more durable product, but it will also be more difficult to correct unsuccessful makeup. You need to be careful with the amount of shadow you apply to make your eyebrows look natural. The application process is identical to a pencil, only the cosmetics are applied with a special brush.
If you can’t correct your eyebrows by plucking them with tweezers, you can purchase special stencils or contact a stylist for long-term coloring.
Drawing arrows and eye contours
The arrows help to enlarge the eyes and give expressiveness to the look.
Use 3 products: eyeliner, eye shadow and pencil:
- Pencil- an option for girls with no experience in applying makeup. It is comfortable and easy to wipe off. The downside is that it doesn’t last as long as other cosmetics and can fall off if you don’t set the edges of the eyeliner with powder.
- Eyeliner- a more durable product, arrows with it turn out more expressive and accurate. It requires experience to use it. At first, you can use a felt-tip eyeliner (it has a thin tip and does not smear).
Eyeshadow lines look harmonious, but due to the crumbly structure, it can be difficult for beginners to apply them strictly along the contour of the eye. Less popular remedy.
The rules for drawing arrows and eye contours are similar for any cosmetics.

Applying shadows
Shadows not only decorate the eyes, but also serve as a base for eyeliner, allowing them to last longer.
If the application tools are ready, you can begin.

You need to use bright shadows carefully and make sure that they match the color of your eyes and skin, and not the color of your clothes and jewelry. The shade of the shadows is selected according to the color wheel.
How to dye eyelashes?
One of the easiest parts of makeup.

For thick and long eyelashes, any high-quality mascara is suitable. Owners of short and sparse eyelashes should choose a product with an effect of volume and length.
The shape of the brush is important: the large number of fibers on it give it length and thickness.
Drawing the contours of the lips
Contouring the lips is not necessary if they are sufficiently defined and voluminous. In other cases, contouring will hide imperfections and complement makeup. A special pencil is used for drawing.
Subsequence:

You can slightly deviate from the natural line of the lips to give them the desired shape.
Choosing and applying lipstick
When choosing a lipstick color, you should make sure that either your mouth or your eyes are bright, otherwise you won’t be able to focus on anything. Any lipstick is suitable for white teeth, but with yellowish enamel it is better not to combine shades of orange and brown. Also, the color depends on the clothing and type of makeup (daytime/evening).
Application:
- perform lip contouring;
- apply the first layer to the lower lip, starting from the center and gradually reaching the corners;
- repeat with upper lip;
- blot with a dry cloth;
- If it’s not bright enough, apply another layer.
Differences between daytime and evening makeup
When choosing cosmetics, you need to consider what type of makeup it will be needed for, because There are significant differences between the daytime and evening options:
Daytime - light and natural. It shows the beauty and health of the face. Light shades and pastel colors are used.
 Evening makeup is characterized by some heaviness and brightness. Usually catchy tones, black eyeliner, etc. predominate. It takes a long time to apply, but is more memorable.
Common Mistakes
Every woman has made mistakes when applying makeup at least once. What not to do:

- Professional makeup artists say that the main thing in makeup is not to overdo it. Everything should look as natural as possible. To do this, it is important not to skimp on good cosmetics and take into account your face type.
- A significant role should be given to skin care before and after makeup: washing, masks and peeling must be done regularly.
- Selection of high-quality cosmetics and tools plays a significant role in performing any makeup. It is important not to skimp on these things, because you will have to apply them on your own face.
Makeup is a process that requires practice. But even for beginners there is nothing difficult about it if you use good products and follow the sequence of applying cosmetics to the face and the rules of makeup.
Video on how to apply makeup correctly
How to apply makeup correctly:
Face contouring:
Detailed make-up lessons are an aid to the selection and application of decorative cosmetics. For experienced professionals and beginners, visual aids and tips will help create an impeccable harmonious image, emphasize natural beauty, place accents, correct the shape of individual parts of the face, and visually hide minor flaws.
Makeup lessons for beginners are practical techniques, techniques, many secrets and tricks for choosing high-quality cosmetics, as well as tools for creating makeup. Before you begin practical training, it is important to know the theory of creating a professional image using cosmetics.
One of the basic rules of makeup is that brushes, sponges and other tools are no less important than the skills of applying products. Good quality brushes will only improve your technique and help you avoid the mask effect, poor shading and the appearance of unnatural spots on the skin.
A makeup artist's arsenal should include the following basic set of brushes:
Brushes must be kept clean and treated with special products. This will help extend their service life and avoid the appearance of germs and bacteria. Professional makeup allows you to disguise imperfections and highlight the main advantages of your appearance.
The work is creative, but for the most aesthetic result it is important to know the secrets and tricks of its creation:

The basic rule of beautiful professional makeup is the choice of quality products.
Savings when purchasing cosmetics should be reasonable, without sacrificing quality. Along with products from the flagships of the beauty industry, in specialized stores you can purchase more affordable, but high-quality eyeshadow palettes, foundations and other makeup products.
Face contouring and toning
Toning and contouring are the basis of professional makeup. There are 3 types of foundations - powder, cream and liquid consistency. There is no need to layer all 3 types of products in one makeup. To create a make-up, you should choose one optimal product, it depends on the task facing the makeup artist.
For specific correction of blemishes and redness, you need to use a concealer of the appropriate shade. The foundation is selected according to the shade and type of skin. The foundation is applied in minimal quantities, blending well, otherwise it will clog into the folds of the skin, disrupting the aesthetic effect.
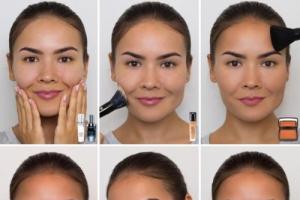
For contouring, products of different shades are used - from the lightest to the darkest. Bronzer and highlighter are used to lighten and darken. It is more convenient to buy a palette with toning correctors in several shades. This technique allows you to visually change the natural shape of parts of the face, place accents, modeling an oval.
To create contouring with foundation you will need:

Contouring is performed according to the following algorithm:
- At the preparatory stage, the skin is cleansed, moisturized, and a transparent base is applied - a primer that evens out the relief.
- The tone is evened out with a foundation of the appropriate shade.
- All areas that need to be visually reduced or shaped are covered with a dark corrector. It is applied along the cheekbones, on the wings of the nose, in the area at the temples.
- Highlighter highlights are applied to areas that will “catch the light.” They highlight the central area of the chin, along the midline of the nose, in the central frontal area, under the eyes, on the protruding line of the cheekbones, and the hollow above the upper lip.
- All individual lines are shaded to avoid unaesthetic spots and sharp color boundaries. Fix the makeup with loose mineral transparent powder.
This scheme for applying corrector products with lightening and darkening of individual zones is suitable for an oval face type. You should know that the main aspect taken into account when contouring is the original shape.

Basic rules and secrets of tinting will allow you to create smooth contours, the optimal basis before applying other decorative products.
Eyebrow shaping
Makeup lessons include several stages. For beginners and those who want to learn how to do beautiful makeup on their own, it is important to strictly follow the step-by-step process. After the foundation is applied and contoured, you need to shape your eyebrows.
Before starting this stage of makeup, it is important to choose the shape, curve and width of the line that suits your face type, and make corrections.
The registration instructions consist of several steps:

If your eyebrow makeup turns out to be too bright and does not harmonize well with the image, you can slightly muffle the contrasting effect by brushing your eyebrows with a concealer or highlighter brush.
Eye makeup
Before applying shadows, a special base is applied to the eyelids, which prevents the pigment from shedding and rolling off, adding brightness and durability to the makeup. Shadows can have a matte effect or shimmer, with sparkling microparticles. For daytime makeup, it is recommended to choose matte shades or shadows with a slight glossy sheen.
Tones with sparkling particles are more suitable for evening makeup. Proper makeup can highlight the natural beauty of the eyes, correct their shape and visually hide flaws.

Shadows can be applied dry to create a daytime make-up, or wet for a brighter evening make-up.
Application instructions:
- The lightest shade from the selected palette is used to paint the inner corner, as well as the area under the eyebrow.
- The entire moving area of the eyelid is tinted with a medium-tone color.
- An accentuating dark tone is applied from the outer corner. The brush should be moved smoothly from the middle of the eyelid, darkening the outer corner area along the eyelash growth line as much as possible.
Classic eye makeup includes 3 shades in one color palette. It is important to achieve the effect of a smooth transition, so all lines between shades are carefully shaded.
Applying blush
Makeup lessons for beginners teach you how to apply blush correctly. An incorrectly chosen tone, consistency or application technique not in accordance with the color type or shape of the face can highlight imperfections and create an unaesthetic blush, like a nesting doll.
- The shade should be in maximum harmony with the skin color, creating a healthy glow.
- Brown, orange, salmon palette is not used for daytime makeup, as they do not look like natural blush.
- The product is applied with special brushes, which allow you to blend evenly and create the desired highlights, emphasizing the line of your cheekbones.
- For professional makeup, two shades of blush are used - dark and as close as possible to the natural tone.
Algorithm for applying blush:

For professional makeup, you can use blush with a dry, crumbly, creamy texture.
Tint blushes are considered one of the most durable and brightest. If you use cream blush, you should apply it before powder, as it has a denser texture.
Lip makeup
For beautiful lip makeup, you can follow simple recommendations:

Instructions for professional lip makeup:

To give a seductive plumpness, create a glossy effect and add volume to thin lips, you can apply a transparent gloss with fine shimmer on top of the lipstick in one layer.
Means and methods for shaping eyebrows
Makeup lessons for beginners include not only a practical part, but also basic theory. There are several types of eyebrow shaping products that differ in consistency, texture, and application technique.
The main types of funds and methods of registration with their help are presented in the table:
| Product name | Popular brands | Design method | approximate cost |
| Pencil | Maybelline, Make Up Studio, L'Oreal, LN Professional | Draw the upper and lower borders from the wide base, shade the entire area, highlighting the tail of the line, shade with a brush | From 200 rub. |
| Shadows (powder) | Avon, L'Oreal, Maybelline, VOV | Place some shadows on the brush, draw an outline with the beveled part, and fill the area inside the borders with color with the flat part. To prevent the shadows from falling off, secure with a fixative gel. | From 500 rub. |
| Gel cream eyeliners | Lancome, NYX, Cailyn, Chanel | Waterproof products are applied with an elastic, beveled brush using strokes. Requires shading immediately as they harden quickly | From 1200 rub. |
| Wax | Milani, Lumene, NYX | Available in pencil form and can be transparent or pigmented. Apply with a flat, dense brush or using strokes with a pencil. Hair is then combed upward for a natural effect. | From 500 rub. |
| Colored mascara | L'Oreal, e.l.f, Maybelline | Used in conjunction with eye shadow or pencil. The hairs are dyed with a brush, giving shade and volume to the hairs, giving a neat look to the eyebrows and fixing the shape | From 400 rub. |
To achieve a natural effect when shaping eyebrows using any decorative product, makeup artists recommend using 2 shades. The line at the wide base is painted with a lighter color, and from the middle of the line is painted with a darker color.

After coloring, you should always shade the shade with a brush, and use brushes with natural dense bristles to form a line and fill in the color.
Nose correction
Knowing the tricks of makeup and skillfully using decorative cosmetics, it is easy to correct the unfortunate shape of the nose:
- too wide wings can be reduced by darkening the area with a foundation 2 shades darker than the main one;
- to correct a long nose, apply a dark shade of foundation or powder to its tip and wings, and a strip of highlighter to the back;
- to correct the “eagle” shape, you can highlight the base of the nose in the area between the eyebrows with a light color;
- A light highlighter line in the middle with darkening of the wings and its convex part will help to visually lengthen the snub nose.
Daytime makeup for different eye shapes
The secret to successful daytime makeup is to choose the most natural, calm shades.
To emphasize the advantages by correcting the flaws, it is necessary to take into account the features of the original shape and location of the eyes:

The listed makeup lessons with step-by-step instructions, techniques, and secrets of professionals for beginners will be the best guide in creating a flawless make-up. The use of techniques using high-quality cosmetics, tools, brushes is the key to success in the art of make up.
Article format: Anna Vinnitskaya
Makeup video tutorials
Makeup for beginners:
Do you want to learn how to do the perfect makeup for yourself, but you’re having trouble? Doing makeup is easier than it seems! We learned from professional makeup artists how to use decorative cosmetics correctly, learn how to draw perfect eyeliner every day, and whether it’s worth signing up for makeup courses for yourself.
In this article we will tell you:
And if it’s difficult to study on your own, choose makeup courses for yourself in Moscow.
How to do face makeup
An even, radiant complexion is an important component of beautiful makeup. Below are simple tips on how to achieve this effect using cosmetics.
What you need for face makeup
If you are just starting to use cosmetics, basic brushes will come in handy - you can buy them as a set or separately. Choose the right ones depending on the products you are going to use.
What brushes are needed for face makeup?
- for foundation- flat synthetic brush or beauty blender;
- for powder- large and fluffy, with a rounded edge;
- for blush- fluffy beveled;
- for concealer- a flat synthetic brush (like for foundation, but smaller);
- For shadows, two brushes are useful: flat - for application and barrel - for shading;
- for eyebrows- a thin, angled brush with hard bristles.
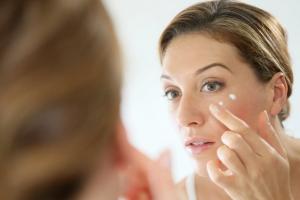
Before applying makeup, professional makeup artists wipe the face with a cotton pad soaked in moisturizing toner to degrease the facial skin and remove excess care cream. Once it is absorbed, you can start applying cosmetics.
Start by applying a basic face makeup product - foundation. Most often, they have the consistency of liquid cream - such products are convenient to apply using a flat synthetic brush or beauty blender. Solid foundation sticks can be blended with your fingers. And the lightweight cushions have a nice foam applicator.
Types of beauty blenders for makeup
1 - triangular sponge, 2 - pear-shaped beauty blender, 3 - beauty blender with beveled edges, 4 - mini blender for hard-to-reach places, 5 - drop-shaped classic sponge, 6 - sculpting beauty blenderAfter you have evened out your complexion with foundation, you can use concealer to spot-correct imperfections - for example, dark circles under the eyes, acne and post-acne. Apply a small amount to problem areas and blend thoroughly.
To set your makeup and avoid shine throughout the day, apply a small amount of compact or loose powder to your T-zone.
If you don’t like the feeling of “a ton of plaster” on your face, you can get by with a light tint fluid or not use foundation at all. It is not at all necessary to use all of the listed products and do a full face of makeup every day.
Do I need to use a makeup base and how to do it?
According to professional makeup artist Nastya Sigmund, not everyone needs a makeup foundation - those with good skin can do without it.
The main task of foundations, or primers, is to make the foundation easy to apply and stay on well, and at the same time to maximally even out the complexion in color and texture. Sometimes make-up artists only use care products under makeup: when the skin is good, everything is easy to apply and stays on well. In everyday makeup, you can safely do without primers, says the makeup artist.
Sometimes bases are still needed. Refreshing, complexion-evening, moisturizing, mattifying primers solve different problems and are suitable for skin with different needs. However, if you don’t want to overload your face, a properly selected skincare product may be the best option.
Nastya Sigmund, makeup artist
Contouring or makeup for cheekbones, forehead, nose and chin - how to correct facial imperfections with makeup
It is believed that correcting the shape of the cheekbones, forehead and nose - contouring - is only appropriate for evening makeup. However, today the line between daytime and evening looks is gradually disappearing, so contouring can be done not only as evening makeup or for a photo shoot, but also for daytime makeup.
The difference between daytime makeup and evening makeup is, first of all, in the girls’ heads. For some, two layers of mascara is already evening makeup, for others it’s normal to do smokey eyes early in the morning and go to work. I never divide either professional or amateur makeup into daytime and evening: any techniques, including contouring, can be used whenever you want. Any new makeup practice should first be tried in front of a mirror in a calm, unhurried environment, and only after that decide: is it necessary? You will never understand whether you like this technique or not until you try it several times, if possible - with different products or in different variations, advises Nastya Sigmund, makeup artist

The master also believes that it is necessary to adapt conventional contouring schemes to your facial features - you can learn this in makeup courses for yourself.
During my lessons, I don’t use any standard schemes - I clearly show girls how contouring looks on their facial contours. In principle, you can darken and lighten wherever you want. For example, cheekbones can be done in different ways: you can darken and make the cheek more round, you can draw a rougher cheekbone in a masculine manner.
It is also not necessary to use a dark contouring product - sculptor. You can highlight those areas of the face that you want to highlight more. This can be done with matte products (light foundation or concealer) or shining highlighters. Select the area under the eyebrow, outline the cheekbones, chin, bridge of the nose, highlight the earlobes or cartilages, collarbones.
When choosing between dry and cream contouring products, Nastya advises to be guided by personal preferences.
Since Soviet times, it seems to many that a dry product is simpler and more understandable. In fact, it often turns out that some people find it easier to use cream products, since it is easy to apply with strokes, and often you can even do without the use of brushes.
Nastya Sigmund, makeup artist
How to do eye makeup
There are many eye makeup options. Together with makeup artist-teacher Diana Trost, we have prepared two step-by-step instructions: how to do basic daytime makeup and bright smoky eyes.
Daytime nude makeup
- Micellar water and eye makeup remover are not suitable, as they always require rinsing off with water (even if the cunning manufacturer wrote “does not require rinsing”)
- You can use a light beige-pink shade.
- The interlash contour looks natural, if you paint it with brown cold kajal - a soft pencil suitable for lining mucous membranes. We fill the space between the eyelashes completely from above - from corner to corner, from below - the outer corner, usually half or 1/3. Never draw an arrow with your eye closed - it will go down. Using a flat brush, blend the lower lash line into a haze like shadow. Unshaded lines at the bottom make the eye smaller.
- Take a sharpened pencil that was used to draw the eyelash contour. Open your eyes, look straight ahead and mark a small arrow, no more than 2-3mm.
- Using a domed soft eyeshadow brush, apply a light brown matte eyeshadow to the outer corner. eyes and into the crease of the eyelid (1/3 or to the middle of the crease). You can take any shade of the natural range. Perfect for drawing shadows and facial contouring products. Apply a little matte shadow to the tip of the brush and tap off the excess by tapping the brush with your finger. The darkest zone in classic makeup is the outer corner of the eye at the arrow, place the first brush stroke there and stretch the color along the crease, towards the center of the eyelid.
- Limit your movements when shading dark shadow: no sweeping strokes towards the nose along the crease and no stretching of the shadow along the brow area. A typical mistake is that beginners cheerfully begin to shade the entire area under the eyebrows and stretch the shadow towards the temple.
- Highlight the lower eyelid (outer corner only, 1/3) with a dark shadow. The very first stroke is also - at the arrow - this is the darkest zone. It is more convenient to do this with a flat brush; it is better to take a soft “loose” brush. Elastic flat brushes with dense bristles will apply the shadow very brightly, in which case you will have to tinker with shading.
- There is no need to highlight the area under the entire eyebrow. Pure white shadows are not suitable for this: take a light cream shade, ivory, baked milk. The same shadow can be applied to the inner corner and to the center of the eyelid.

Smokey eyes
- Cleanse your face and apply skincare products.
- So that the shadows do not roll longer, Clean your eyelid with a special eyelid toner. Micellar water and eye makeup remover are not suitable as they always require rinsing off with water.
- Apply a matte nude eyeshadow to the upper eyelid up to the brow bone. You don’t have to powder your moving eyelid with shadow if you want the pigments to appear brightly on it. It is very important to work the shadow of light flesh shades into the sub-eyebrow area - along the crease of the eyelid and above, to the eyebrow. This will make it very easy for you to blend dark shadows along the crease and corner.
- The interlash line looks especially beautiful if you make it dark brown with cool kajal. We fill the space between the eyelashes completely from above - from corner to corner, from below - the outer corner, usually half or 1/3.
- Blend the lower eyelash contour with a flat brush - into a haze, like shadows. Unshaded lines at the bottom make the eye smaller.
- We take a sharpened pencil, which we used to draw the eyelash contour, and draw an arrow. Open your eyes, look straight ahead.
- Take a thin beveled brush and lightly draw a pencil arrow, drawing the thinnest tip. which is fading away. A pencil lead will never draw a thin tip, only a brush!
- Using a soft domed eye shadow brush, apply a dark matte shadow to the outer corner of the eye and into the crease of the eyelid.(1/2 or to the middle of the fold, depending on the structure of the eyelid). If you apply the shadow throughout the crease to the inner corner, the look will be more dramatic. In a classic smokey eye, both the upper eyelid crease and the entire lower eyelid are covered with a dark shadow.
- Apply a little matte shadow to the tip of the brush and tap off the excess by tapping the brush with your finger. Pay attention to where you place the first brush stroke - this will be the darkest/brightest place in the makeup. In classic makeup, this is the outer corner of the eye at the arrow - place the first brush stroke there and stretch the color along the crease, towards the center of the eyelid. Limit your movements when shading the dark shadow, no sweeping movements towards the nose along the crease and no stretching of the shadow along the brow area.
- Emphasize the lower eyelid (only the outer corner for a more natural makeup, or 2/3 if you have a classic smokey eye) with a dark shadow. It is more convenient to do this with a flat brush; it is better to take a soft “loose” brush.
- Use a light matte or satin shadow to highlight the highest point of the eyebrow (brow break). Lighten the inner corner of the eye with similar shades, above and below, matte or satin shadows; shimmering shadows are acceptable in wedding and evening makeup types.
- You have already drawn an arrow with a pencil, to make it brighter, outline the finished pencil line with eyeliner with a thin soft brush (you can do this with a liner and a hard brush in the eyeliner). The harder you press the brush, the thicker the line. Try to paint very thinly, you can always apply a second layer and add thickness if necessary.
- Place a drop of eye cream on the tip of a cotton swab so that the tip of the stick is saturated with cream. We use this stick to clean the shadows under the eyes that have crumbled during work until the stick is clean. Do not swipe the cream stick close to the shadows on the lower eyelid, otherwise you will get a streak instead of a beautiful shading. The area closest to the shadows can be gently cleaned with the dry, clean end of a cotton swab. If you still hit the shading, put a little bit of nude matte shadow on a small barrel brush and carefully blend the resulting stripe.

Which eyeliner to draw perfect arrows
To draw arrows, makeup artists use different types of eyeliners: liquid and gel, pencils and markers. Makeup artist-teacher Diana Trost spoke about the advantages and disadvantages of each of them.
Tips for choosing and using eyeliners from a professional makeup artist
- Pencil arrows look very natural, especially if you shade them.
- For beginners, it is best to start with an arrow drawn with shadows or a pencil: they are not so obvious, and small mistakes in makeup can be quickly corrected with a cotton swab.
- Pencils often imprint on the eyelid and roll off, so do not forget to powder the eyelid with transparent nude shadows, and the eyeliner itself with shadows to match the pencil or any other colored shadows (almost all eyeshadows fit tightly on the pencil, and you can make the eyeliner in different shades, even if you only have a black pencil).
- Liquid eyeliner is more durable. But it requires skill. The harder you press the brush, the thicker the line will be. Training with a teacher will help you master the subtleties of the craft. Liquid eyeliner with a thin soft brush is suitable for both young girls and adult ladies, since a soft brush applies a line without gaps and does not pull the skin of the eyelid, like a marker or any hard brush.
- If you bought eyeliner with an unsuccessful “hard” brush, take any thin artistic brush (they are sold in stores for artists).
- Gel eyeliner is the most durable product that almost never marks on the eyelid. It is applied with a special thin soft beveled brush (not to be confused with an eyebrow brush - an eyebrow brush is larger in size and shorter in length). It is applied more slowly, in strokes, so it is easier for beginners to work with it. But gel eyeliner is not economical: it dries quickly when more than half of the product remains in the jar.
- It is convenient to work with an eyeliner-marker on an open, mobile eyelid. It makes it easy to control the thickness of the arrow, unlike a soft brush. However, markers dry out quickly and are not suitable for aging skin.
On her channel, Diana shows how to draw symmetrical perfect arrows.
How to make your eyes look bigger with makeup
Often girls strive to enlarge their eyes with makeup, to make them bright and expressive. Below is a detailed video instruction on how to do this using basic cosmetics: mascara, eye shadow, concealer, eyeliner. This makeup is suitable for any eye shape, daytime and evening makeup.
How to draw eyebrows
Correctly tinted eyebrows will instantly make your look expressive, while incorrectly placed accents, on the contrary, can distort facial features. How to choose the appropriate eyebrow shape and what makeup products to use,
How to do lip makeup
To make your makeup look good, you need to take care of your lips regularly.
When we apply lip makeup, it is important that they are not dry. To do this, you need to use balms or special lip oils. Well-groomed lips without flaking are the key to making your makeup look beautiful. You can also use primers for your lips. These products fill in small imperfections and make lips look smoother. I won’t say that this is a mandatory remedy. If your lips are well-groomed, then there is no need for a primer in your makeup, - makeup artist Nastya Sigmund
It is not at all necessary to draw a clear contour of the lips - in some techniques, for example, ombre, it is not needed at all. You can also do without a pencil if you prefer translucent shades and light textures: tints, glosses, balms. But fans of bright and dark lipsticks should listen to the advice of a makeup artist.
If you want to make the outline of your lips clear, you need to draw it with something sharp: if it’s a brush, it should have a thin outline. If we draw lips with a pencil, then it needs to be sharpened well. You can do it without a brush and without a pencil - paint your lips with lipstick from a stick, but in this case the tip of the lipstick should be as pointed as possible.
Nastya Sigmund, makeup artist
If you do makeup for yourself, you can easily do without a special lip brush - most liquid products have convenient applicators, and classic cream lipsticks are easily applied from a stick. Makeup artists use brushes more for hygiene reasons.

How to fix and maintain makeup
You can fix your makeup using thermal water - to do this, spray it from an arm's length distance onto the completed look. You can also use special fixing sprays - many professional cosmetic brands have them.
To prevent makeup from wearing off your face too quickly, you should reapply it throughout the day. Take lipstick with you and touch up as needed. If an oily sheen appears in the T-zone, gently blot it with a mattifying napkin or lightly powder it. And for maximum makeup durability, choose products marked waterproof. They can even withstand rain or tears.
How to remove makeup
No matter how cool your makeup is and no matter how much you want to keep it for the next day, it’s worth remembering that it must be removed before going to bed. If you don't wash off your makeup in time, it can clog pores, cause redness and inflammation, and make your complexion uneven and dull.
If you applied a minimum of products, a simple wash with your favorite cleansing gel or foam will be enough. But if you did complex evening makeup, used long-lasting or waterproof cosmetics, it is better to take a special makeup remover.
Usually used for makeup removal:
- milk is a universal makeup remover;
- lotion: regular or two-phase - for long-lasting eye makeup;
- wet wipes - in cases where it is not possible to wash;
- micellar water - for face and eyes;
- hydrophilic oil or balm - for foundation.

Use the product according to the instructions on the package, and then finish cleansing with your favorite foam or gel.
How to learn makeup for yourself
Of course, you can learn how to do makeup yourself - to do this, you can watch video and photo tutorials, of which there are plenty on the Internet, and also regularly practice in front of a mirror. But for those girls who want to master makeup for themselves perfectly or, on the contrary, cannot achieve results on their own, they are suitable.
Makeup artist-teacher Diana Trost told why taking such courses is better than learning from videos.
There are many free lessons on the Internet, but who records them? Usually these are people who simply show how they apply makeup - these are not educational video tutorials. What they show is not always correct, and often the authors of the videos contradict each other. How can a beginner find the truth among mountains of confusing information?
Diana Trost, professional makeup artist
Course teachers provide an individual approach and build a curriculum taking into account the requirements of students.
Make-up courses for yourself are suitable for everyone - no matter what level of training you have: you are an artist, or you are just taking your first steps in make-up. The program is usually selected individually, since each face is unique - it is impossible to make up everyone according to a general scheme. Faces, of course, can be divided into types - “square”, “triangular” and others, but each of us has our own unique anatomical features that are suitable for different makeup techniques. Besides, all girls have different needs. Some people want to learn how to do natural makeup, some want to do wedding makeup, others are interested in business makeup with transformation into evening makeup, says the makeup artist.
During the training courses, teachers will not only show you how to do beautiful makeup, but also share practical knowledge:
- will teach you how to choose appropriate cosmetics and use professional brushes;
- they will put their hand down and work with you on the correct movements when applying makeup;
- They will explain how to emphasize your strengths and hide the imperfections of your face;
- will show you how to create a suitable image depending on the occasion;
- will monitor the work and help analyze errors.
Choose courses based on the description of the training program, focus on reviews, the professionalism of the teacher and the duration of the courses!
Learn, try, experiment, and you will definitely succeed!
Makeup helps a woman look impressive. Even an older face, which has been applied with proper make-up, is noticeably transformed. To learn how to use cosmetics, you need desire. Makeup for beginners includes applying tone, shaping eyes, eyebrows, and lips. For such manipulations, you need to have a basic set of cosmetics on hand and know a little theory. Step-by-step instructions for beginners on the basics of makeup at home will help you understand the intricacies of the process.
Makeup information
Makeup (visage, make-up, make-up) is the art of decorating the face with the help of special pigment products. Thanks to makeup, skin imperfections are hidden, texture is evened out, and shape is corrected. The emphasis is on the merits of appearance.
Make-up is impossible without decorative cosmetics, as well as materials that help apply products to the face. In Makeup Basics for Beginners, a separate lesson is devoted to applying cosmetic products to the face.
Nuances:
- Primer and foundation can be applied with a sponge (a beauty blender is especially popular now), a brush with synthetic bristles, or with your fingertips.
- Eye makeup is done with a natural spatula brush or a round applicator.
- Eyelashes are painted over with a brush and mascara.
- The powder is applied with a large brush with natural bristles.
- To shape the eyebrows, an angled flat brush is suitable; before doing this, the eyebrow hairs should be combed with a comb-brush.
- Lipstick is applied to the lips with your fingertips. A medium-thick synthetic brush also copes well with this task.
Makeup for beginners begins with purchasing the necessary decorative products. The most useful things to fill your makeup bag:
- primer;
- foundation;
- several brushes;
- mascara;
- eye shadow;
- eyeliner or pencil;
- eyebrow shadows;
- lipstick or gloss;
- powder;
- blush.
Instructions for basic makeup at home
Makeup artists who are deeply familiar with a wide variety of makeup say that there are six important skills at the heart of basic makeup. This is about:
- preparatory stage and applying the base (on the face and eyelids);
- decorating eyes with shadows;
- shading and selection of coloring compositions for the moving part of the eyelids;
- staining of the mucous membrane, interciliary area;
- working with mascara;
- highlighting the eyebrow area.
Preparing and applying the base
Fresh make-up is applied to a clean, toned and moisturized face. After using foam, tonic, or cream, you should perform an important preparation step - apply a primer (base) to your face.

The primer prepares the dermis for subsequent interaction with cosmetic products. It protects the skin from the influence of external adverse factors, and also smoothes the relief, hides imperfections (pimples, enlarged pores, dull color of the epidermis, etc.).
There are several types of base. Among them, facial primers and eyelid primers stand out. The latter have a gentle effect on the delicate skin around the eyes and allow subsequent products to lie smoothly on the eyelids.
Important! The primer can be applied to the face in 2-3 thin layers. It is recommended to cover the eyelids with the base in only one layer. Otherwise, the shadows will look too dense and heavy.
If a girl thinks that she needs to hide dark circles under her eyes, then concealer comes to the rescue. It reliably masks blue stains. Some beauty bloggers use concealer as a base for their eyelids.
Making eyes with shadows
Makeup step by step for beginners means, after primer, start applying eye shadow.
For a beginner in makeup, the easiest way to work is with dry and liquid shadows. First, select a light shade of eyeshadow, for example, radiant beige. A small amount of the product is placed on the eyelid at the inner corner of the eye. After using a brush or fingers, the pigment is spread throughout the skin of the eyelids to the eyebrows.
Choosing shadows and shading
After applying a light tone to the entire upper eyelid, the girl proceeds to work with the moving area of the eyelid. A small amount of darkened tone is placed on the skin of the outer corner. It blends easily into the middle of the eyelid. A little color is placed in the very middle, which is lighter than the shadows at the outer corner, but darker than the initial light shadows.
Peculiarities:
- For heavenly colored eyes, gray-silver, dusty, beige, champagne-colored shadows are suitable.
- Green eyes will be decorated with soft violet, copper, bronze, and chocolate shadows.
- Brown eyes love metallic sparkles, burgundy, brown, dark coffee, olive shades.
- It is recommended to paint gray eyes for girls whose color type is autumn with deep blue, smoky-gray colors, and olive gold.
Staining of the mucous membrane and intercilia
The interlash area is painted over so that eye makeup for beginners looks harmonious. The emptiness between the eyelashes looks sloppy. Therefore, it is important to work well in this area with a dense brush. In a nude, everyday make-up, the area is painted with shadows. In the evening, apply eyeliner and a dark pencil.
To paint the mucous membrane, a special pencil was invented. Its name is kayal. It does not cause irritation. A tip for shaping the mucous membrane is to slightly pull the eyelid away from the eye. In daytime make-up, the mucous membrane is often painted in light colors. For an evening out, dark shades are used.

Working with mascara
Mascara is applied to the upper eyelashes in several thin layers. Painting should be done in the direction of hair growth. Particular attention is paid to the bristles on the inner corner. They are decorated most densely with the tip of a mascara brush. The lower eyelids are painted in 1 layer.
Highlighting the eyebrow area
Makeup from scratch, step-by-step instructions for beginners, involves proper eyebrow shaping. It is best to start painting from the body of the eyebrow, smoothly moving to its tip. The very beginning of the eyebrows are painted over with minimal pressure on the pencil. If eyebrow shadows are used, then most of the coloring pigment falls on the body, arch and tip of the eyebrow.

Lesson on drawing arrows
Eyeliner makeup for beginners begins step by step with choosing a coloring tool. This can be eyeliner, felt-tip pen, shadow pencil or regular pencil. Professionals advise taking the first steps in the design of arrows using a moderately hard contour pencil.
Sequencing:
- You need to start your make-up by applying a primer and shadows.
- The interciliary space of the upper eyelid and mucous membrane are painted with a dark pencil.
- Makeup artists recommend drawing a stroke from the tip. Depending on the shape of the eye, it will be raised (if the outer corner of the eyelid is drooping), or straight (for Asian and almond-shaped eyes), or slightly drooping (for fox, slanted eyes).
- Next, draw a line with a pencil that runs parallel to the base of the eyelash area.
- The arrow narrows towards the inner corner and widens slightly towards the outer corner. At the outer corner it flows into the already drawn tail.
Additional Information. To disguise the arrow irregularities that a beginner might make, the arrow is expanded, making it large and noticeable.
How to make a simple make-up
How to apply makeup for beginners step by step? You don't have to visit a makeup artist to look fresh and impressive. The simplest make-up can be done at home:
- In makeup step by step for beginners, an important step is to apply primer and concealer.
- The foundation is applied 2-5 minutes after using the primer. Sometimes the primer does a very good job of camouflaging the skin. In this case, you can exclude foundation.
- After this, the skin is lightly powdered and the design of the eyes begins.
- In everyday makeup, you can avoid using shadows, especially if there is a primer on the eyelids.
- The authors of online makeup courses warn that while you can do without shadows, you cannot do without mascara.
- After painting your eyelashes with mascara, you need to shape your eyebrows.
- The next step is to apply blush to the cheekbones and apples of the cheeks. This is done with several strokes of the brush.
- In the step-by-step instructions for beginners in makeup from scratch, you can do without lipstick. Lip gloss will do.

Applying evening makeup in stages for beginners allows for the use of brighter shades than for daytime makeup.
The first part of the process description duplicates all the manipulations performed for daytime makeup. It is important to apply primer, concealer, and shape your eyebrows.
Evening makeup looks dull if you don’t use shadows. Therefore, the choice of shadows for the evening should be approached decisively. The following tones are suitable for blue, green, gray eyes:
- dark violet;
- smoky gray;
- nut;
- chestnut.
The following tones are suitable for brown eyes:
- dark chocolate;
- oil colors;
- deep emerald;
- deep blues, etc.
Note! The lipstick color can be made bright or invisible. In this case, the condition applies: the darker the eye color, the darker the lipstick can be.

Every girl can do simple makeup at home. To do this, you should have cosmetic products and know the sequence of application of all products.
Video
In this material we will tell you about all the tricks and rules of makeup for beginners and offer several options for simple but effective looks. If you are just starting to use cosmetics, but don’t know where to start and what products to use, read our article.
Makeup Basics: 3 Rules
© site
Matching foundation
Creating makeup, as a rule, begins with applying foundation. A properly selected product will hide skin imperfections, even out skin tone and prepare your face for subsequent stages. The foundation can be powdery, creamy or in the form of a light fluid. When choosing it, rely on its type (ours will help you determine it). For oily skin, powders are suitable, for normal and mixed tonal fluids, and for dry skin, a nourishing creamy texture is needed.
Minimum funds
If you are new to makeup, use as few products as possible and gradually add new items from the world of cosmetics to your arsenal. To get started, the following set is enough: foundation, mascara, light shadows and blush. Such a minimal set will hide skin imperfections and give it a healthy look, while mascara and shimmering shadows will instantly make your look more open.

© lorealmakeup
Proper makeup remover
If you have started actively using cosmetics, then you must add one more step to your standard care procedure -. In addition to the usual washing gel, you will need a makeup remover. This can be a two-phase product with added oils, micellar water or hydrophilic oil. Choose what suits you best and does not irritate your skin. High-quality facial cleansing is the key to beautiful and healthy skin.
How to do eye makeup for beginners?
Unusual eye makeup doesn't have to be complicated. Follow our instructions to create eye makeup in trendy red tones.
Prepare the eyelid for applying shadows, spread with a thin layer or primer. Powder light shadows on top.

© site
Add a lilac shade to the crease of the eyelid and blend into a light haze.

© site
Apply a dark shade with glitter to the entire eyelid. At the outer corner, gently blend, combining with purple shadows.

© site
Emphasize the lower eyelid with darker purple shadows, a small dense brush is suitable for this.

© site
Use a soft black pencil to line the mucous membrane of your eyes.

© site
Apply mascara to your eyelashes. Eye makeup is ready!

© site
If you don't know which eye makeup to choose, take our quick test: it will tell you the right way.
How to quickly create lip makeup?
If you choose bright lipstick for your makeup, follow our tips for applying it.

© lorealmakeup
Moisten your lips with a nourishing balm and after a couple of minutes, remove the residue with a napkin. Using a pencil that matches your lipstick, begin contouring, starting with your upper lip. Draw a line from the top corner of the lip to the middle.

© site
Repeat the same action with the second corner, creating a “cross” in the center of the lips.

© site
Mark the central part of the outline of the lower lip.

© site
Place small dots between the already drawn lines and the corners of the lips. With their help you can easily complete the outline.

© site
Connect all parts of the circuit.

© site
Fill in your lips with pencil and then lipstick. This way the coating will be uniform and durable. In this way you can create both glossy and matte lip makeup.

© site
Everyday face makeup for beginners
Skin preparation
Cleanse your skin and apply moisturizer. In a few minutes you can use . Choose depending on your skin type. Apply concealer to the area under your eyes and hide imperfections with corrector. Blend all products thoroughly so that no borders or uneven texture are visible.

© site
Eye and eyebrow makeup

© site
Lip makeup
Apply light lipstick or gloss to your lips. For everyday makeup, it is better to use moisturizing lipsticks with a creamy texture. They take care of your lips and are easy to touch up throughout the day.

© site
Setting makeup
Use a fluffy one with some powder on it to set your makeup. Apply blush and, if desired, highlighter to the apples of your cheeks.

© site
Find another makeup option “for every day” in our video.
Day makeup
Daytime makeup is done in delicate shades, and the technique for creating it is as simple as possible. Follow our instructions to freshen up your look in five minutes.
For daytime makeup, a light foundation in the form of a cushion or will be enough. Apply it in a thin layer using a sponge.

© site
Using concealer, lighten the area under the eyes, this will remove bruises and refresh your look. Apply concealer locally using a brush and blend with your finger. The warmth of your hands will warm up the product and distribute it in an even layer.

© site
Apply a refreshing blush to your cheeks. Blush in a stick is perfect for daytime makeup; they are easy to apply and blend.

© site
For eyebrows, use a pencil or tint gel: these products will highlight the eyebrows, but will not make them too graphic.
Apply soft pink shadows with tiny gold particles all over the eyelid; they will instantly add shine to your eyes. Apply volumizing mascara to your upper lashes.

© site
For lips, use peach gloss, it will add volume and moisturize your lips. Makeup is ready!

© site
evening make-up
Evening makeup requires extra staying power, so choose a foundation that will stay on your face all evening. Apply it with a brush, this way you will achieve a denser coverage. Hide all imperfections and dark circles under the eyes with.

© site
Apply primer to your eyelids. To create makeup you will need three shades of eyeshadow from the same brown-bronze range: light, medium and dark. Apply the lightest shade to the corner of the eye, add light bronze shadows to the center of the eyelid, and darken the outer corner with the deepest shade. Erase the boundaries between the shadows by blending them slightly.

© site
Draw a light arrow with a dark brown or bronze pencil. This trick will visually make your eyelashes thicker. Curl your eyelashes using a curler and apply two layers of mascara.

© site

© site
Simple makeup for beginners: step-by-step Photo instructions

© site
Start your makeup by preparing your skin. Cleanse your face with cotton pads soaked in toner. Apply moisturizing day cream and lip balm, wait a couple of minutes. Then carefully distribute the foundation using a sponge, brush or fingers. Check for borders on the lower arch of the jaw, apply a little foundation on the neck to avoid the effect of a mask.